Rain Barrels and Downspouts: A Guide for Rhode Island Homes
Place barrels on level bases, fit the right diverter, route overflow away from foundations, and disconnect before freezes in Rhode Island.

A 55-gallon rain barrel can fill with about 1/4 inch of rain, so the setup only works well if your downspout, overflow, and winter plan are all in place.
If you want to use roof runoff at home in Rhode Island, the short answer is simple: put the barrel on level ground, connect it to a clean downspout with the right diverter, send overflow away from the house, and disconnect it before hard freezes. That matters even more in a state that gets about 45 to 50 inches of precipitation each year.
Before you install anything, focus on these points:
- Check your gutters first. Clogs, loose joints, and bad slope can send water the wrong way.
- Pick the right spot. A full 55-gallon barrel weighs more than 450 pounds.
- Match the diverter to your downspout. Many homes use 2x3-inch downspouts, while larger systems may use 3x4-inch sizes.
- Plan overflow from day one. Extra water should drain away from the house, not spill at the base of the wall.
- Test after setup. Watch for drips, backup, and poor drainage after the first storm.
- Disconnect before freeze season. Water expands by about 9% when it freezes, which can crack barrels and fittings.
A safe setup does two jobs at once: it stores water for outdoor use and still moves extra runoff away from your home. The guide below walks through location, installation, overflow, and cold-weather shutdown in plain terms.
Rain Barrel Installation with Downspout Diverter
sbb-itb-634c8b2
Choose the Right Barrel Location and Connection Point
Before you buy a barrel or order a diverter kit, take a few minutes to walk around your yard. The spot you choose will shape how easy the whole setup is to use.
Pick a Level Spot Near a Useful Downspout
Start with a downspout that drains toward the garden beds or lawn you already water. Then place the barrel as close as you can to the area you use most. That simple move saves time and makes the water far more useful.
A full 55-gallon barrel weighs more than 450 pounds, so it needs solid, level support underneath. Set it on a level 2-by-2-foot base made from pavers, blocks, or treated lumber. The base should extend 2 inches past the barrel on all sides. It also helps to lift the barrel about 1 foot off the ground, since that gives you better gravity-fed flow through a hose.
Match the Barrel to Standard Downspout Sizes and Parts
Most Rhode Island homes have 5-inch K-style gutters, and those setups usually connect to 2x3-inch downspouts. Homes with steeper roofs or larger drainage areas may use 6-inch gutters with 3x4-inch downspouts. Historic homes can be a little different, with round or half-round gutters that need specific diverter adapters.
| Downspout Type | Common Sizes | Typical Rhode Island Use |
|---|---|---|
| Rectangular (K-Style) | 2x3 in., 3x4 in. | Standard residential homes |
| Round | 3 in., 4 in. | Historic homes with half-round gutters |
| Corrugated/Flexible | Varies | Connecting diverters in tight spaces |
Once the barrel is steady in place, measure the downspout before you buy the diverter kit. Most standard kits come with a screened inlet, spigot, overflow port, fill hose, and fine mesh screens that help block debris and mosquitoes.
After the barrel is set and the parts line up, the diverter decides when runoff fills the barrel and when extra water passes by it.
How to Install a Downspout Diverter
How to Install a Rain Barrel in Rhode Island: Step-by-Step Guide
Once the barrel is measured and in place, it's time to install the diverter. This part links the downspout to the barrel while keeping the main downspout line open.
How a Diverter Fills the Barrel and Routes Excess Water Back Down
A diverter fits into a cut opening in the downspout and sends part of the rainwater through flexible tubing into the barrel. The barrel inlet needs to sit at the height listed by the kit, and the hose should run level to match that inlet height.
When the barrel is full, extra water keeps moving down the original downspout path. That means the gutter can still drain like normal. Put simply, the diverter fills the barrel without blocking the downspout.
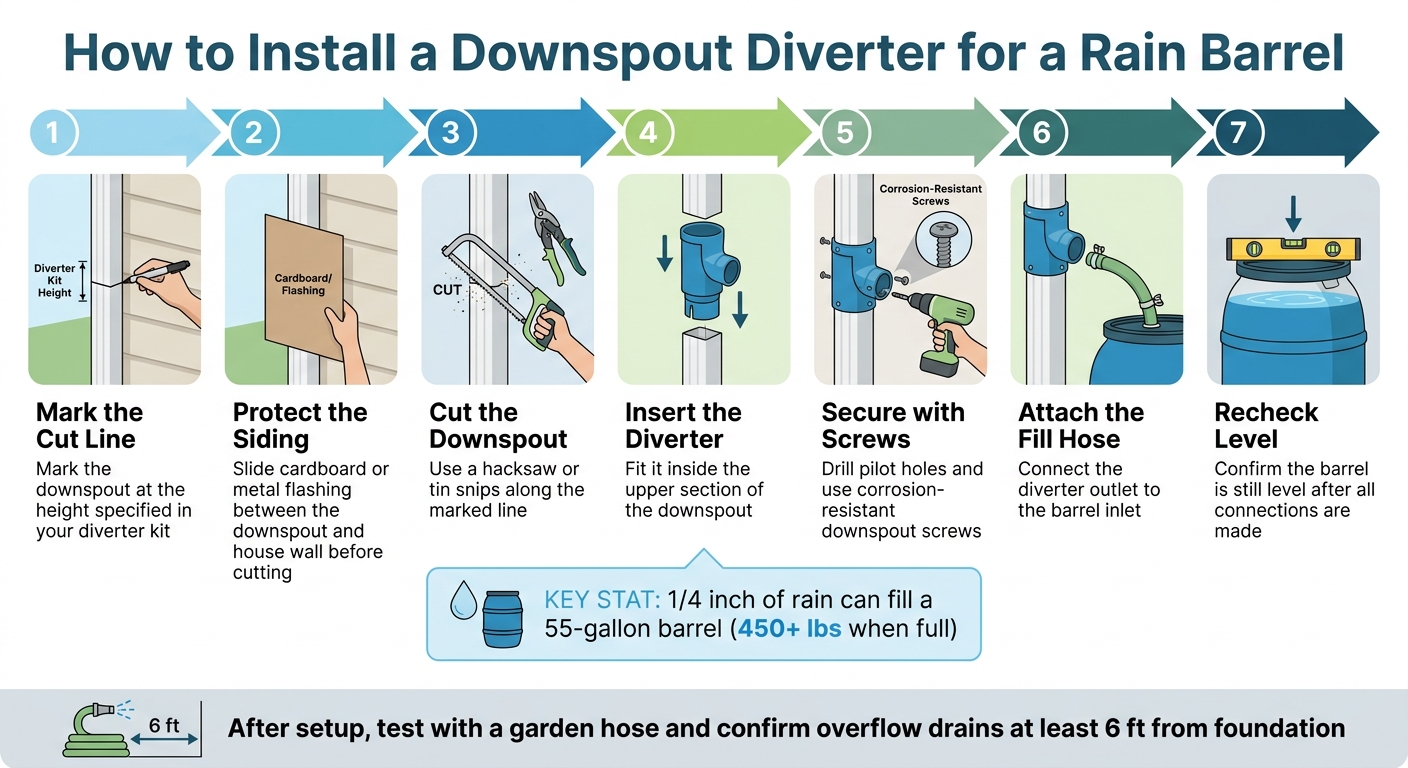
Step-by-Step Diverter Installation
Place the barrel next to the downspout so you can mark the connection height. Many kits say the opening should sit about 2 inches below the top of the diverter or elbow so it fits snugly.
Then follow these steps:
- Mark the cut line on the downspout at the height listed in your diverter kit.
- Protect the siding by sliding a piece of cardboard or metal flashing between the downspout and the house wall before cutting.
- Cut the downspout with a hacksaw or tin snips along the marked line.
- Insert the diverter so it fits inside the upper part of the downspout.
- Secure it with corrosion-resistant screws. Drill pilot holes and use downspout screws to hold the diverter in place.
- Attach the fill hose from the diverter outlet to the barrel inlet.
- Recheck that the barrel stayed level.
Test the System After the First Storms
Test the setup with a hose first, then check it again after the first storm. Run water through the gutter and make sure the barrel fills as expected. Also confirm that overflow drains away from the foundation - at least 6 feet away if your home has a basement, or 2 feet away if it has a crawl space.
After that first storm, do a quick check:
- Look at each connection point for drips
- Check the screens and clear out any debris
- Make sure water isn't backing up toward the gutter line
If water backs up, the diverter height or the overflow path is off.
Plan Overflow So Gutters and Foundations Keep Working
Once a rain barrel fills up, its overflow stops being a small detail. It becomes part of your drainage system.
And rain barrels fill fast. Just 1/4 inch of rainfall can fill a standard 55-gallon barrel. After that, every extra drop needs a place to go. If it doesn’t have one, trouble starts fast.
What Happens When a Full Barrel Has No Overflow Path
If a full barrel has no clear path for extra water, it spills over the top and pools right next to the house. That can put water where you least want it.
There’s another issue too. In heavy rain, water can back up into the gutter line if the overflow has nowhere to go. So the overflow route matters just as much as the inlet. Think of it this way: getting water into the barrel is only half the job. Getting extra water safely away from the house is the other half.
Rhode Island building code backs this up. All roof drainage systems must prevent water from accumulating against foundations.
Safe Overflow Routes for Rhode Island Properties
The simplest setup is an overflow hose connected to a port near the top of the barrel. Run that overflow away from the foundation, then let it end on a splash block or stone apron so the water doesn’t wear away the soil.
If your yard is flatter, it often makes more sense to direct overflow to a planted area. A rain garden is a shallow planted area that absorbs runoff and can handle heavy runoff during storms. Installation usually costs about $50–$150.
Common overflow options include:
- A direct drain hose
- A splash block
- A rain garden
For many Rhode Island homes, a direct drain hose plus a splash block is the simplest way to handle overflow. In flatter yards, a rain garden usually works better.
Disconnect in Late Fall and Reconnect in Spring
Once you've dealt with overflow, the next job is shutting the system down before freezing weather can do any damage.
Why Rhode Island Homeowners Disconnect Before Hard Freezes
In Rhode Island, it's smart to disconnect your rain barrel before you get several nights around 28°F. When water freezes, it expands by about 9%. That might not sound like much, but inside a barrel that's even partly full, that expansion can split seams, crack plastic, and damage spigots or fittings.
A good rule: watch your 10–14 day forecast and aim to disconnect the system two to three weeks before the first hard freeze is likely to hit.
How to Winterize and Restart the System in Spring
After you drain the barrel, you need to either store it or set up a bypass so the downspout still works all winter.
Start by opening the spigot and letting gravity drain the barrel. Then tip the barrel to empty the water that sits below the spigot level. Once it's empty, take off the parts that need protection from cold weather. Clean the barrel with a 1:1 mix of white vinegar and water before storage.
Remove the fill hose, diverter, and plastic parts like spigots, Y-valves, and quick-connects. Store them indoors in a labeled bag so cold weather doesn't make them brittle. Downspout Services sees cracked plastic fittings on Rhode Island homes every spring, almost always from parts left on the barrel through a hard freeze.
You'll also want a winter bypass kit or a temporary extension to send roof runoff away from the foundation. That keeps winter drainage working and can help reduce basement moisture and icy walkways.
You have a few storage options:
| Storage Option | Best Use | Risks | Effort |
|---|---|---|---|
| Indoor Storage (Garage/Shed) | Maximum protection from UV and ice; extends barrel lifespan | Requires storage space and some effort to move the barrel | Low once moved |
| Outdoor Empty & Inverted/Tilted | Saves indoor space and helps prevent ice from collecting on the lid | High winds can move an empty barrel; secure it with straps | Medium |
| Winter Bypass Kit | Keeps the downspout functional while the barrel stays in place | Any trapped water can still freeze and crack fittings | Low |
| Outdoor Insulated (Empty) | Can buffer temperature swings for an empty barrel | Not a substitute for draining; trapped moisture is still a risk | High |
When spring comes, reconnect the system after the last freeze risk has passed. Check the barrel body for hairline cracks, inspect gaskets and seals for brittleness, and add fresh PTFE (Teflon) tape to all threaded fittings. Then switch the diverter back to collection mode and make sure the overflow path is still clear and still sends water away from the foundation.
FAQs
How much roof runoff can one barrel capture?
Use this formula: roof area (sq. ft.) × rainfall (in.) × 0.623 = gallons captured.
Here’s the part people often miss: count only the roof section that drains to the connected downspout, not the whole roof. If one downspout handles just one side of the house, use only that section in your math.
If you want a closer estimate, add a runoff coefficient based on the roofing material:
- 0.95 for metal
- 0.85 for asphalt shingles
- 0.75 for tile
That extra step helps account for water loss before it reaches the downspout.
Can I connect multiple rain barrels to one downspout?
Yes - you can connect more than one rain barrel to a single downspout to increase your total storage.
You can link barrels in series with hoses, tubing, or PVC pipe, either at the top or near the bottom. Bottom connections are often the better pick because they let the water level even out across all barrels. That means the barrels fill and drain together instead of one filling up long before the others.
It’s also smart to add an overflow hose to the last barrel in the chain. That way, extra water gets pushed away from your home’s foundation instead of pooling near the house.
Do Rhode Island towns have rules for rain barrel use?
Yes. In Rhode Island, rain barrel rules can change from one town to the next, and your own property details matter too.
In many towns, a small residential rain barrel setup is allowed without a permit. But if you're planning a larger system, adding a cistern, or connecting the setup to irrigation, you may need building, plumbing, or zoning approval.
Your system also needs to drain the right way so water doesn't collect near your home's foundation. That's a big deal, because poor drainage can lead to water problems fast.
Before you install anything, check with your local building department or conservation district. If you live in a neighborhood with an HOA, review those rules too.