

Paver Sealing Guide: Protect Your Driveway in 2026
Sealing pavers is the most cost-effective way to prevent driveway damage—this 2026 guide covers prep, sealant choices, application steps, and maintenance.
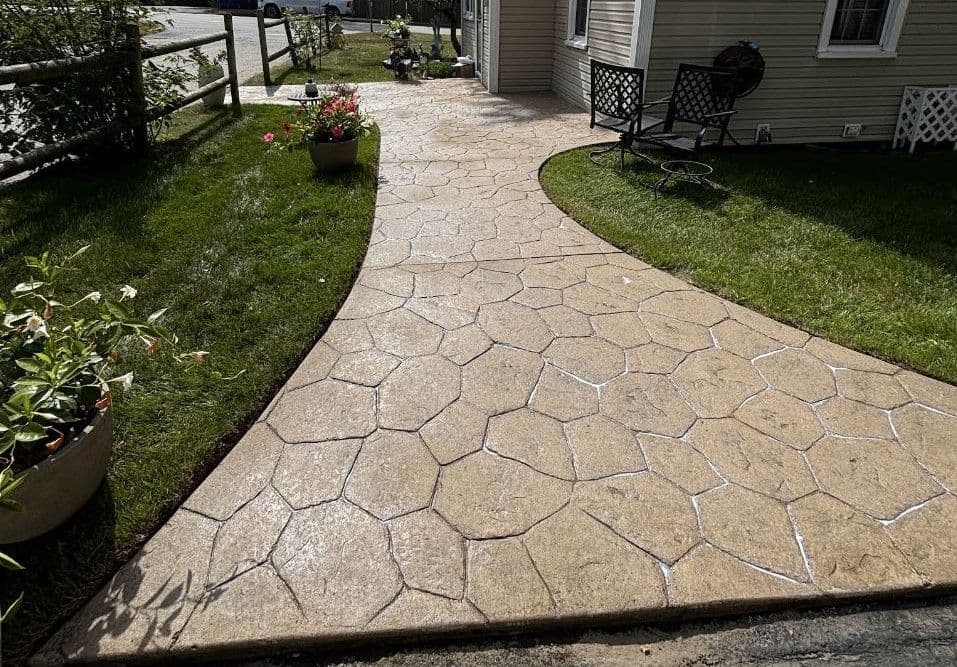
Sealing your driveway pavers in 2026 is a smart way to protect against UV damage, water seepage, stains, and wear from weather and traffic. A good sealant enhances durability, prevents cracks, and reduces long-term maintenance costs. This guide covers the latest sealing advancements, preparation tips, application steps, and maintenance advice.
Key Takeaways:
- Why Seal? Protects pavers from fading, cracking, stains, and erosion.
- Latest Updates (2026): New material-specific sealers, improved UV resistance, and eco-friendlier options.
- Preparation: Inspect, clean, dry, and sand pavers before sealing.
- Application: Use thin coats, proper tools, and follow temperature/weather guidelines.
- Maintenance: Reseal every 3–5 years, clean regularly, and refill sand joints as needed.
- DIY vs. Professional: DIY costs less ($145–$350 for 1,000 sq. ft.) but requires time and precision. Professionals charge $600–$1,700 but offer better results and longevity.
Sealing keeps your driveway looking great and prevents costly repairs. Follow these steps to ensure long-lasting protection.
How to Clean and Seal Pavers | COMPLETE GUIDE
sbb-itb-634c8b2
Preparing Your Driveway for Paver Sealing
Getting your driveway ready for paver sealing is crucial if you want the sealer to last years instead of peeling off within months. Missing even a single step can lead to trapped moisture, cloudy spots, or even permanent stains. Set aside three full days for the process: one for cleaning, one for drying and sanding, and one for sealing.
Inspecting and Repairing Damaged Pavers
Start by thoroughly inspecting your driveway. Look for loose pavers, cracks, uneven areas, and any drainage problems. Pay attention to stains - green often signals algae, black suggests tire marks, orange or brown points to rust, and white indicates efflorescence. Each type of stain requires a specific approach for removal.
Before sealing, fix any uneven or damaged pavers, replace broken ones, and remove weeds from the joints. Cleaning is also key. Use a pressure washer with a setting between 1,500 and 2,500 PSI and a 15- or 25-degree fan tip to clean the surface without causing damage. Choose your cleaner based on the stain type: sodium hypochlorite for algae, degreasers for oil and petroleum, and oxalic acid for rust.
"I've watched more pavers ruined by aggressive pressure washing than any other single mistake." - Jesse Johnson, Bulletproof Pavers
Cleaning and Sanding Before Sealing
Once you’ve completed the repairs, focus on cleaning and sanding. After pressure washing, allow the pavers to dry completely - this usually takes 24 to 48 hours. Even if the surface feels dry, moisture might still be trapped inside. To check, tape a 12x12-inch piece of clear plastic to the pavers for four hours. If fogging appears underneath, you’ll need to wait longer.
When the pavers are dry, refill the joints with sand. Use polymeric or standard sand and sweep it into the joints until it’s just below the surface of the pavers. Then, compact the sand using a padded plate compactor to ensure it settles properly. Make sure to clear away all dust afterward - any leftover grit could bond with the sealer and create a rough texture. Finally, confirm the weather conditions are ideal before proceeding to seal.
Best Weather and Timing for Sealing
Once the driveway is prepped, timing and weather become critical for a successful seal. The air and surface temperatures should be between 50°F and 95°F during application. Keep in mind that dark driveways can heat up quickly in the summer, sometimes reaching 140°F by midday. This can cause the sealer to dry too fast, leaving roller marks. Use an infrared thermometer to check the surface temperature before starting.
Choose a three-day window with no rain forecasted. Fall, especially from September to early November, usually offers the most reliable conditions with moderate temperatures and lower humidity. Spring can work too, but avoid weeks with heavy pollen, as it can settle into the finish and ruin the look. Also, turn off any sprinkler systems 24 hours before cleaning and keep them off for 48 hours after sealing. Proper timing ensures the sealer adheres well, protecting your driveway for years to come.
"The extra week you wait for the right window will save you months of staring at cloudy sealer and years of premature maintenance." - Jesse Johnson, Bulletproof Pavers
Choosing the Right Sealant and Tools for 2026
Types of Sealants for Driveway Pavers
When selecting a sealer, consider factors like your driveway material, the level of traffic it endures, and the finish you want. Film-forming sealers are popular for their protective layer and finish options ranging from matte to high-gloss. Acrylic sealers are a go-to for residential use. Solvent-based acrylics provide that bold "wet look" with enhanced color, while water-based options are easier on the environment, offering 75–90% fewer VOCs and quicker drying times. If durability is your priority, polyurethane and epoxy sealers are your best bet. They stand up to heavy traffic and resist abrasion and chemicals, making them a solid choice for busy driveways.
On the other hand, penetrating sealers work by soaking into the paver's pores, forming a water-repellent barrier without altering the surface's appearance. Among these, silane-siloxane sealers are highly effective, causing water to bead on the surface and offering protection that lasts 7–10 years. High-grade penetrating sealers can reduce water absorption by up to 95%, making them ideal for areas prone to heavy rain or freeze-thaw conditions.
Your choice of finish also plays a role in maintenance and aesthetics. High-gloss sealers enhance color and create a shiny "wet" look but typically require reapplication every 2–3 years. In contrast, penetrating sealers preserve the natural appearance of the surface and can last 5–10 years between applications. For example, Foundation Armor AR350 scored a perfect 10.0/10 for achieving a wet look without overdoing the shine, while their SX5000 WB earned an 8.5/10 for its natural finish and up to 10 years of protection.
"The decision to seal or not to seal directly impacts your long-term maintenance costs and the overall value of your hardscaping." - TSS Pro Sealants
Once you've decided on the right sealant, make sure you have the proper tools to achieve a flawless application.
Essential Tools
The right tools can make all the difference between a polished, professional-looking finish and a patchy, uneven mess. For large driveways, a low-pressure pump sprayer ensures even distribution of the sealer. Pair it with a 3/8-inch nap roller, which is ideal for applying film-forming acrylics smoothly and preventing puddles. A soft broom is perfect for back-rolling, helping to eliminate lap marks and ensure a uniform finish.
Before sealing, a pressure washer is crucial for deep-cleaning the pavers and clearing out any debris from the joints. Protective gear is also a must - gloves, safety glasses, and a dust mask will keep you safe, especially when working with solvent-based products that emit strong fumes. Cleanup is easier with water-based sealers, which only require soap and water, whereas oil-based products will need solvent-based cleaners.
| Tool | Purpose |
|---|---|
| Low-Pressure Pump Sprayer | Ensures even sealer distribution over large areas |
| 3/8-inch Nap Roller | Provides smooth application and precise coverage |
| Soft Broom | Helps eliminate lap marks during back-rolling |
| Pressure Washer | Deep-cleans pavers and removes debris before sealing |
| Protective Gear | Ensures safety when handling chemicals |
Equipping yourself with the right tools ensures a smooth application process and a professional-looking result.
Step-by-Step Guide to Sealing Driveway Pavers
Once you've prepped your driveway and gathered the right tools, it's time to start sealing. But before diving in, it's smart to take things slow and begin with a small test area. Using 2026-approved sealants and methods is key to getting the best results.
Test the Sealant First
Before sealing the entire driveway, test the sealant on a hidden spot. Choose an area that's not easily visible - like along the edge near your garage - and apply the product. Let it cure for 48 hours. This waiting period helps you confirm how the color, sheen, and overall finish will look on your pavers.
Start with a simple water-drop test. Sprinkle a few drops of water on the surface. If the water beads up, it means there's an old sealer or residue preventing absorption. If the water soaks in evenly, you're good to go.
"Sealing pavers after pressure washing is not a magic trick, it is disciplined craftsmanship." - Jesse Johnson, Bulletproof Pavers
Once you're confident with the test results, you can move on to sealing the full driveway.
Applying the First and Second Coats
The first coat, often called a "flood coat", needs to fully saturate the paver surfaces and the sand joints. Apply it in the morning when temperatures are between 50°F and 90°F. Use a low-pressure sprayer for even application, then immediately back-roll with a 3/8-inch nap roller. This step pushes the sealant into the joints and smooths out spray lines or puddles. It also helps secure the joints and prevents sand from washing away.
Let the first coat dry for 2–4 hours (or up to 24 hours, depending on the product). After that, apply a lighter second coat for even coverage and the desired finish. Using two thin coats is better than one heavy coat - this approach reduces the chances of bubbling or discoloration and ensures a more thorough cure. For tricky spots like edges and corners, use a handheld brush to ensure complete coverage.
Curing Time and Post-Application Care
Once you've applied both coats, proper curing is crucial. Avoid walking on the pavers for 24–48 hours and keep vehicles off the area for at least 72 hours. To check if it's safe for foot traffic, use the heel print test - if your heel leaves an impression, the sealant hasn’t fully cured yet.
"Generally, pavers should cure for 24–48 hours before you allow foot traffic in the area and at least 72 hours before any vehicle traffic." - Allan Betz, Owner, Betz Works
Make sure no rain is expected for 12–24 hours after application, as water during this time can cause issues like pitting or a cloudy finish. Keep the area clean by removing dirt, leaves, and debris. To protect surrounding landscaping, walls, and joints from overspray, use painter’s tape or shields.
Maintaining Sealed Driveway Pavers
Taking care of your sealed driveway pavers helps maximize their lifespan and ensures they remain functional and visually appealing.
Regular Cleaning and Maintenance
Keeping your pavers clean is key to preserving their condition. Sweep them weekly to remove dirt and debris, and rinse them down every few weeks to prevent stains and scratches. Once a year, use a gentle pressure wash with a wide-angle spray to avoid disturbing the joint sand.
For routine cleaning, stick to mild soap and water. If you notice joint sand wearing away, refill it as needed. This helps maintain the stability of your pavers and keeps weeds or insects from settling in.
When to Re-Seal Your Pavers
To keep the sealant effective, regular maintenance is essential. Most driveways need resealing every 3–5 years, while high-traffic areas may require attention more often, around every 2–3 years. Decorative pavers in low-traffic spots might only need resealing every 4–5 years.
A simple water test can help you decide when it's time to reseal. Pour water on the surface and observe how it behaves:
- If water beads up for 5 minutes or more, your seal is still doing its job.
- If water soaks in within 1–2 minutes, plan to reseal within six months.
- If water absorbs immediately, resealing should be done as soon as possible, ideally within six months.
Inspect your driveway each spring, checking for fading, sand loss, or stains that may have developed over the winter. However, avoid over-sealing, as applying sealant too frequently (more than once every two years) can lead to problems like cloudy buildup, peeling, or slippery surfaces. Keeping a maintenance log with details like the last application date, sealer type, and weather conditions can help you stay on track.
Preventing Common Problems
Timely care can help you avoid issues like weeds, stains, and shifting pavers. Weeds often grow when joint sand erodes or the sealant weakens. Regular sweeping removes seeds before they can sprout, and keeping joint sand levels intact helps block weed growth. If weeds do appear, pull them out right away and refill the joints.
For oil or grease stains, act quickly by using a degreaser or kitty litter to absorb the mess, then clean the area with mild soap. Rust stains from metal furniture or fertilizer can be treated with a rust remover specifically designed for pavers. Be cautious with tools - avoid metal shovels or anything sharp that could scratch the surface.
During winter, skip using salt, as it can damage the sealant. Instead, opt for sand or deicers that are safe for pavers. High-traffic areas where tires frequently turn may show wear faster, but these spots can often be touched up individually without resealing the entire driveway. A little consistent care now can save you from costly repairs down the line.
| Maintenance Task | Frequency | Purpose |
|---|---|---|
| Sweeping/Rinsing | Weekly/As needed | Prevents debris from causing stains or scratches |
| Visual Inspection | Annually (Spring) | Identifies wear, fading, or joint erosion |
| Water Beading Test | Annually | Checks if the sealant is still effective |
| Joint Sand Refill | As needed | Maintains stability and prevents weed growth |
| Full Resealing | Every 3–5 years | Restores protection against UV and stains |
DIY vs. Professional Paver Sealing: Which Is Right for You?

DIY vs Professional Paver Sealing Cost and Quality Comparison
Once you understand the sealing process, the next big decision is whether to roll up your sleeves and do it yourself or hire a professional. This choice often boils down to weighing the upfront cost against the quality and longevity of the results. While DIY can seem like the cheaper route, it’s not without its risks - and those risks can lead to extra expenses.
Comparing Costs, Time, and Results
For a 1,000-square-foot area, DIY sealing costs typically range from $145 to $350, while hiring a professional can run between $600 and $1,700. The difference in price reflects more than labor - it’s also about the materials. DIY sealers, which often have higher water content, last about 1–2 years, whereas professional-grade products can last 3–5 years.
Time is another factor. Sealing a standard driveway yourself can take 10 to 18 hours, spread over several days. And then there’s the potential for mistakes. Missteps like sealing a damp surface, applying too much product, or misjudging the weather can lead to issues like streaks, peeling, or clouding. Fixing these errors often requires professional intervention, adding to your costs.
| Feature | DIY Sealing | Professional Sealing |
|---|---|---|
| Upfront Cost | $145–$350 (1,000 sq. ft.) | $600–$1,700 (1,000 sq. ft.) |
| Time Investment | 10–18 hours over multiple days | 1 day or less |
| Lifespan | 1–2 years | 3–5 years |
| Material Quality | Retail-grade (high water content) | Commercial-grade (high solids) |
| Results | Risk of streaks and uneven finish | Smooth, uniform finish with warranty |
| Equipment | Basic rollers, rented pressure washers | Industrial sprayers, power sweepers |
Professionals bring specialized tools - like industrial sprayers and power sweepers - that ensure a level of precision you just can’t match with a roller or squeegee. They also take care of crucial prep work, such as deep cleaning, pressure washing, and ensuring the surface is completely dry. These steps are essential to avoid common DIY pitfalls.
All these factors make professional sealing a better option for achieving a durable, polished finish, especially in areas with challenging conditions.
Why Choose Downspout Services for Paver Sealing
If you’re in Rhode Island or Connecticut, the local climate adds another layer of complexity. Freeze-thaw cycles and high humidity can make proper sealing tricky. That’s where Downspout Services comes in. Their team uses commercial-grade materials and equipment designed to handle these conditions, ensuring the sealant adheres properly despite temperature swings and moisture.
From crack filling to power washing, their preparation process eliminates the guesswork. And unlike DIY, their work comes with a warranty on both materials and labor. While the upfront cost is higher, the payoff is a longer-lasting, professional finish that not only protects your driveway but also enhances its appearance and durability.
"Hiring a paver pro near you to clean and reseal your pavers can save money in the long run, even though you need to pay more initially." - Scott Dylan Westerlund, Contributing Writer, Angi
Conclusion: Protect Your Driveway Investment in 2026
Sealing your driveway pavers isn’t just about looks - it’s about safeguarding a major investment and avoiding expensive repairs down the line. A good sealant acts as a shield, protecting against oil stains, UV damage, freeze-thaw cycles, and even the growth of weeds and moss that can weaken the surface. In fact, sealed pavers can cut annual maintenance costs by as much as 80%, dropping from $250–$1,125 per year for unsealed driveways to just $15–$230.
With proper preparation, a sealant can provide a finish that lasts 3–5 years. Picking the right sealant is key: whether you go for a durable, penetrating water-based option or one that enhances the natural look of your driveway, the right product can help extend its lifespan to over 20 years. This means less maintenance and more long-term savings.
To keep things in top shape, a quick water test each spring can help you determine when it’s time to reseal, and regular cleaning will prevent dirt and debris from accumulating. Whether you choose to DIY or hire professionals like Downspout Services for a commercial-grade finish, sealing your driveway is an investment that pays off in curb appeal, durability, and peace of mind.
Your driveway faces it all - blazing summer heat, harsh winter deicers, and everything in between. Sealing is the most effective way to protect it from these elements and keep it looking great for years to come. Make 2026 the year you safeguard your driveway from premature wear and costly repairs.
FAQs
How do I know my pavers are dry enough to seal?
To determine if your pavers are ready for sealing, touch the surface to check for any dampness or moisture. The pavers must feel completely dry before you begin. Sealing too soon - while the surface is still damp - can lead to problems like cloudiness or uneven drying. After cleaning or pressure washing, allow the pavers to dry thoroughly. Depending on the weather conditions, this process could take several hours or even up to a full day.
Which sealer is best for my driveway - wet look or natural finish?
The right sealer for your project depends on the look you want and how much upkeep you're willing to handle. Wet look sealers bring out colors, add a glossy sheen, and emphasize texture - perfect if you're going for bold, eye-catching curb appeal. On the other hand, natural finish sealers keep things low-key with a matte finish that protects while maintaining the surface's original appearance. Go with a wet look for a striking effect or stick with a natural finish for a more subtle, classic vibe.
What causes sealer to turn cloudy or peel, and how can I prevent it?
When sealer turns cloudy or starts to peel, it's often due to trapped moisture, applying it at the wrong time, or contamination on the surface. To steer clear of these problems, make sure the surface is completely clean and dry before you begin sealing. Opt for breathable sealers to reduce the risk of moisture getting trapped underneath. Also, let each coat dry completely before adding another layer. A little extra care during preparation and application can save you from these headaches.

