Spring Gutter Installation Guide for Rhode Island Homes
Spring guide to selecting, installing, and protecting gutters in Rhode Island — materials, slope, downspouts, and guards.

Spring is the ideal time to install or replace gutters in Rhode Island. Why? Because melting snow and heavy rains can overwhelm damaged systems, leading to foundation issues, soil erosion, and costly repairs. Moderate spring temperatures also allow sealants to cure properly, ensuring a durable system.
Here’s what you need to know:
- Why Spring? Prepares your home for heavy rains, protects landscaping, and repairs winter damage like sagging or detached gutters.
- Key Tips: Use a slope of 1/4 inch per 10 feet, install hangers every 18–24 inches, and choose durable materials like aluminum or copper.
- Avoid Vinyl: Rhode Island’s freeze-thaw cycles can make vinyl brittle and prone to cracking.
- Gutter Types: Seamless gutters reduce leaks, while K-style gutters handle higher water volumes. Half-round gutters suit historic homes but hold less water.
- Gutter Guards: Micro-mesh guards are best for blocking debris like pollen and seeds while managing heavy rain.
For DIY, ensure proper measurements, secure installation, and test water flow. If unsure, professional services can ensure a reliable system tailored to Rhode Island's coastal weather. Protect your home before spring storms hit!
Tools and Materials for Gutter Installation
Required Tools
Having the right tools is key to a safe and effective gutter installation. Start with a ladder equipped with a stabilizer to ensure secure roof access. A tape measure and chalk line will help you take precise measurements and mark straight lines for installation. A cordless drill is essential for driving fasteners, while a level ensures you achieve the correct slope - 1/4 inch per 10 feet - toward the downspouts. For cutting gutter sections and downspouts to size, keep tin snips or a hacksaw nearby. Additionally, use a gutter-rated sealant, specifically 100% silicone designed for exterior use, to create watertight joints that can handle Rhode Island's fluctuating temperatures.
"Use 100% silicone. It is suitable for the exterior. Many people use kitchen and bath silicone for outside that is not correct." – Ryaan Tuttle, Home Improvement Specialist
Don’t forget safety gear! Wear gloves to protect your hands and safety glasses to shield your eyes during the installation process. With these tools in hand, you’ll be ready to move on to selecting the best materials for Rhode Island’s climate.
Selecting Materials
After assembling the necessary tools, focus on choosing materials that can withstand Rhode Island's weather conditions. Aluminum gutters are a popular choice due to their affordability, rust resistance, and durability - especially when made from .032 gauge material, which is ideal for coastal environments. Use hidden hangers or brackets with rust-resistant screws, such as stainless steel, to ensure a longer-lasting gutter system.
Your material list should include gutter sections (commonly 5 to 6 inches wide for residential properties), end caps, connectors, corner miters, downspouts, elbows, straps, and splash blocks. If your home is near the coast, consider upgrading to copper gutters. While they come at a higher cost - ranging from $20 to $40+ per linear foot compared to aluminum’s $6 to $12 - they offer unmatched longevity (up to 100 years) and natural resistance to salt corrosion.
| Material | Estimated Cost per Linear Foot | Best Use Case |
|---|---|---|
| Aluminum | $6 – $12 | Standard homes; good for coastal areas |
| Copper | $20 – $40+ | Premium homes; excellent salt resistance |
| Steel | $9 – $18 | Areas with heavy snow loads |
| Vinyl | $5 – $10 | Budget projects (not ideal for RI) |
Avoid vinyl gutters if you live in Rhode Island. They tend to become brittle and crack during the freeze-thaw cycles common in New England's winters. By using the right tools and selecting durable materials, you can ensure your gutter system will handle Rhode Island’s challenging spring weather with ease.
sbb-itb-634c8b2
DIY Guide To Installing Gutters
How to Install Gutters: Step-by-Step Process

5-Step Gutter Installation Process for Rhode Island Homes
Step 1: Measure and Assess Your Roof
Getting the measurements right is the first step in ensuring your gutters can handle those heavy spring rains in Rhode Island. Start by measuring the roof edge lengths with a tape measure and jot down each section's dimensions. Next, mark the highest point of each gutter run about 1.25 inches below the roof flashing using a chalk line. This setup ensures rainwater flows directly into the gutters, even during downpours.
Check the fascia boards by pressing them with a screwdriver. If they feel soft or spongy, they need to be replaced - rotted fascia won't support the weight of water or ice. Plan for one downspout for every 30 to 40 feet of gutter. For longer runs (over 35 to 40 feet), place the high point in the center and slope the gutters toward downspouts at both ends to avoid water pooling .
Step 2: Prepare the Fascia and Remove Old Gutters
Once you're confident in your measurements, it's time to prep the fascia and remove any old gutters. Begin by detaching the existing gutters, brackets, and fasteners, working systematically from one end to the other. Use a pry bar to carefully remove hangers secured to the fascia. Inspect the fascia boards for signs of damage, such as rot, cracks, or water stains. Replace any damaged sections with durable materials like pressure-treated wood, aluminum, or vinyl.
Before moving forward, clean the fascia by removing old nails, debris, and peeling paint. This step ensures a smooth and stable surface for mounting your new gutters.
Step 3: Install Gutter Sections with Correct Slope
Cut the gutter sections to fit your measurements using tin snips or a hacksaw. Starting at the high point you marked earlier, secure hidden hangers every 18 to 24 inches along the fascia . In regions like Rhode Island, where snow and ice are common, closer spacing - around 16 to 18 inches - is better for added support. Align hangers with rafter tails, which are typically spaced 16 inches apart, for extra stability.
Use rust-resistant screws that penetrate at least 2 inches into the fascia for a firm hold. Maintain a slope of 1/4 inch to 1/2 inch for every 10 feet of gutter, directing water toward the downspout . Check the slope with a level as you go to ensure consistency. Apply 100% exterior-grade silicone sealant between the fascia and the back edge of the gutter to prevent water from seeping behind the system.
"If you seal the gap between the fascia board and the gutter when any water runs onto the facia from the roof, it will not run behind the gutter. It will run into it." – Ryaan Tuttle, Home Improvement Specialist, Best Handyman, Inc.
Once the gutter sections are securely in place and properly sloped, you're ready to move on to installing the downspouts.
Step 4: Attach Downspouts and Secure Connections
At the marked downspout locations, cut outlet holes using a jigsaw or tin snips. Attach the downspout connectors with waterproof sealant and secure them with short metal screws or pop rivets . Use pliers to crimp the ends of each downspout section so they fit snugly into the outlet tube or the next section below.
Secure the downspouts to the wall using straps or brackets every few feet to keep them stable during storms. Direct water at least 3 to 4 feet away from your foundation using extensions, splash blocks, or underground drain lines . For larger roofs, common in New England homes, consider using 3x4 inch downspouts to handle greater water volumes during heavy rains.
Step 5: Seal Joints and Test Water Flow
Seal all joints, end caps, corners, and seams with 100% silicone sealant. Let the sealant cure according to the manufacturer's instructions before testing .
Once the sealant is set, test the system by running water from a garden hose at the gutter's high point. Check for leaks at the joints and ensure water flows smoothly to the downspouts without pooling . If you notice standing water, adjust the slope by repositioning the hangers. For areas where water overshoots the gutters, such as roof valleys, install splash guards to keep the flow contained. To prevent clogs, place a wire screen over each downspout outlet.
Choosing the Right Gutter Type
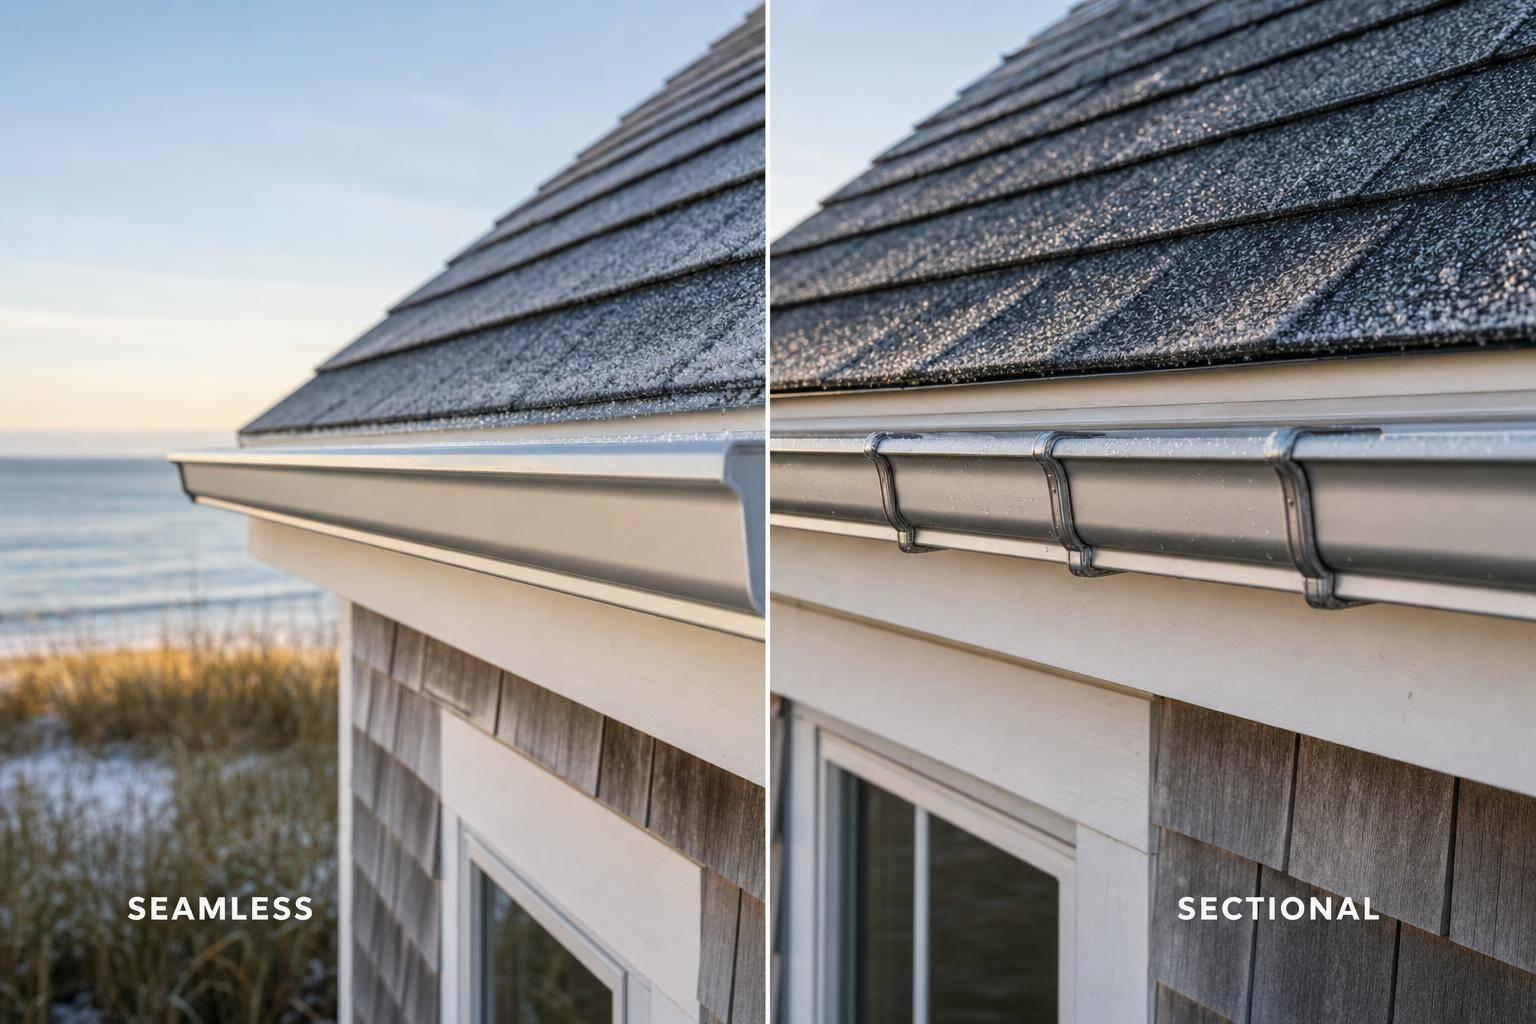
Seamless vs. Sectional Gutters
Picking the right gutter type can make or break your home's ability to deal with Rhode Island's unpredictable weather. Seamless gutters are crafted on-site from a single piece of metal, like aluminum or copper, with seams only at corners and downspout connections. On the other hand, sectional gutters are pieced together from pre-cut sections joined with connectors, which increases the chance of leaks and debris buildup.
Seamless gutters are often the better choice for areas prone to heavy rain, snow, and freeze-thaw cycles - conditions that put extra strain on sectional systems. As Ruby, a home improvement author, explains:
"Seamless gutters have become one of the most popular options because they reduce leaks and last longer than sectional styles".
Here's a quick comparison to help you decide:
| Attribute | Seamless Gutters | Sectional Gutters |
|---|---|---|
| Construction | Custom-formed continuous runs | Shorter sections joined with connectors |
| Leak Potential | Low – fewer seams | Higher – more joints that can leak |
| Maintenance | Low – minimal joints to seal | Moderate – joints may require resealing |
| Rhode Island Performance | Excellent for heavy rain and snow | Prone to issues during freeze-thaw cycles |
If you're planning a full gutter replacement this spring, seamless aluminum or copper gutters are a solid investment for durability and less maintenance. Sectional gutters, however, might be a practical option for quick fixes or smaller sections where a seamless system isn't feasible.
Once you've decided on the type of gutter assembly, it's time to consider the profile design for optimal performance.
K-Style and Half-Round Gutters
After settling on seamless or sectional gutters, the next step is choosing the right profile. K-style gutters, with their flat back and angular front resembling crown molding, fit snugly against the fascia and provide extra interior volume to handle more water. In contrast, half-round gutters feature a smooth, U-shaped channel that allows debris to flow more easily but has a smaller capacity.
For most homes, K-style gutters are the go-to option because of their strength and ability to manage heavy rainfall and snow. As Brothers Gutters highlights:
"A K-style gutter is what is most commonly used on residential and commercial homes... This design has proven to be effective for handling large amounts of water without overflowing".
Half-round gutters, while less common, are often chosen for historic restorations or homes where a traditional look is desired.
For the majority of homeowners, seamless 5-inch or 6-inch K-style gutters in aluminum or copper strike the best balance between performance and low maintenance. If you're working on a historic property, half-round gutters can deliver the classic aesthetic you're after - just make sure they're sized to handle your roof's water runoff effectively.
Adding Gutter Guards to Your System
Installing gutter guards alongside new gutters can save you time on gutter guards vs. regular cleaning while protecting your home from debris buildup. Rhode Island's lush tree cover, filled with oaks and pines, poses year-round challenges. Spring is particularly tough, as pollen and seeds can clog gutters that lack proper protection. Gutter guards act as a shield, keeping debris out while ensuring water flows smoothly to your downspouts.
In addition to preventing clogs, gutter guards help protect your home from water damage. By reducing overflow, they minimize risks like soil erosion, basement leaks, and damage to siding and fascia boards. For coastal regions like Newport, they also offer added defense against salt air, which can wear down standard gutter materials over time.
Types of Gutter Guards
Micro-mesh guards are highly effective for managing Rhode Island's springtime debris. These fine screens block pollen, seeds, pine needles, and even sand grit, while handling heavy rainfalls with ease.
Reverse curve (solid) guards use surface tension to channel water into the gutter while larger debris, like leaves and twigs, slides off. This design is ideal for homes surrounded by dense trees and can handle the high water volumes typical of spring storms.
Brush and foam guards are more budget-friendly but less suited to Rhode Island's conditions. Brush guards trap larger leaves in their bristles but may let smaller debris, like seeds, slip through. Foam guards, which sit directly in the gutter trough, tend to wear out faster under heavy rain or snow, requiring frequent replacements.
For homes near the coast, stainless steel micro-mesh or copper guards are recommended to resist corrosion from salt air. High-quality mesh systems generally last 10 to 15 years with minimal upkeep.
How to Install Gutter Guards
Before installing gutter guards, inspect and clean your gutters and fascia to ensure a solid base. Use 100% exterior-rated silicone to seal joints, ensuring water flows properly into the gutter.
For micro-mesh guards, secure the screens over your existing gutters to create a durable barrier. Foam and brush guards are easier to install and simply fit into the gutter trough, though they may require more frequent maintenance. Reverse curve guards often need professional installation to ensure the water is correctly directed using surface tension.
Once installed, test the system by running water from a hose at the highest point of your gutters. This helps check for any leaks or blockages. Next, consider how professional installation could further enhance your gutter system's efficiency.
Professional Installation with Downspout Services

Why Work with Downspout Services
Downspout Services offers Rhode Island homeowners expertise in designing gutter systems that can handle the region's challenging weather. From heavy coastal rain to salt-laden air and icy winters, they know how to create installations that last. Each project begins with a thorough inspection of your home's drainage needs, roof slope, and structural condition to ensure the system performs well over time.
They use heavy-gauge aluminum with a 0.032-inch thickness and special coatings to resist rust and corrosion caused by coastal salt air. For homes that face intense spring storms, they recommend 6-inch gutters paired with 3x4 downspouts, which provide 40% more drainage capacity compared to standard systems. Instead of traditional spikes, they use steel-reinforced hangers, which allow gutters to stand up to high winds and heavy rainfall - both common in Rhode Island.
Their technicians also evaluate your fascia boards for seasonal wood rot, repairing any damage to ensure gutters are securely mounted. This level of care helps prevent system failures and protects your home. Additionally, Downspout Services is fully insured, giving you peace of mind throughout the process. Their attention to detail ensures a smooth and reliable guard installation experience.
Getting a Free Estimate
Scheduling a consultation with Downspout Services is simple and hassle-free. You can call their service line, fill out an online form, or even send a text to request a free estimate. They offer flexible scheduling options, including same-day or next-day appointments, to accommodate your needs.
During the consultation, a technician will perform a complimentary evaluation of your gutter system. This includes checking drainage efficiency, ensuring proper slope, and assessing the structural integrity of the system. Afterward, you'll receive a written estimate that outlines material options and customized drainage solutions for your home. This is also a great time to discuss concerns about Rhode Island's unpredictable spring weather and explore options like seamless gutters or gutter guards to reduce maintenance efforts.
Conclusion
Installing gutters this spring is a smart way to protect your Rhode Island home from water damage. Gutters play a crucial role in directing rainfall and snowmelt away from your foundation, helping to prevent issues like soil erosion, basement leaks, and expensive foundation repairs. With Providence averaging 47.2 inches of precipitation annually, even a small 0.25-inch rainstorm can send a staggering 312 gallons of water toward your foundation if your gutters aren't doing their job properly. These basics lay the groundwork for the detailed installation steps discussed earlier.
The success of your gutter installation hinges on the details. Factors like ensuring the right slope, securely mounting the system, and using reliable sealants can mean the difference between a gutter system that endures for decades and one that fails after a tough winter.
Rhode Island's coastal weather demands materials that can handle challenges like salt air, heavy spring rains, and ice buildup. Aluminum gutters are a popular choice, offering rust resistance at a cost of $2 to $6 per linear foot. Seamless gutter designs are another great option, as they reduce the chances of leaks.
Beyond installation, regular maintenance is just as important. Whether you're taking on the project yourself or hiring professionals like Downspout Services, acting before the spring storms hit is essential. Following a spring cleaning checklist and cleaning your gutters twice a year and checking for damage after winter helps ensure your system stays in top shape. A well-maintained gutter system not only protects your home’s structure but also preserves your landscaping and helps you avoid costly repairs.
FAQs
Do I need 5-inch or 6-inch gutters?
When deciding between gutter sizes, it all comes down to your home's specific needs. 5-inch gutters are a standard pick for most residential homes, offering reliable performance for typical rainfall. On the other hand, 6-inch gutters are a smarter choice if you live in an area with heavy rainfall or have a larger roof that collects more water.
In Rhode Island, you'll also want to factor in the local weather patterns and the amount of debris, like leaves, that might accumulate. If you're uncertain, reaching out to a local professional can help ensure your home’s water management system is up to the task.
How many downspouts does my house need?
The number of downspouts your home needs depends on factors like the size of your house, the total roof area, and Rhode Island's rainfall patterns. Typically, a single downspout can manage runoff from about 600–800 square feet of roof. So, if your roof covers 2,400 square feet, you’d likely need 3–4 downspouts. Keep in mind that local weather conditions, such as heavy rain or snow, might demand additional downspouts to handle the extra water. To ensure your drainage system works effectively, it’s a good idea to consult a local professional who can assess your specific needs.
When should I hire Downspout Services instead of DIY?
If you’re looking for a reliable and long-lasting gutter installation designed to handle Rhode Island’s challenging weather and debris, hiring professional downspout services is the way to go. Experts ensure your gutters are installed with the correct pitch, securely fastened, and made from durable materials to help prevent water damage. They can also manage intricate setups, adhere to local regulations, and save you both time and money by avoiding costly errors. This level of expertise is especially crucial during Rhode Island’s unpredictable spring season.